
1. 화면을 구성하는 방법
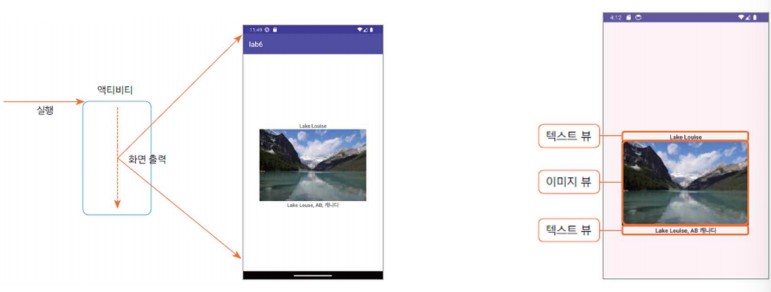
1. 액티비티 -뷰 구조
- 화면을출력하는컴포넌트는액티비티
- 화면에내용을표시하려면뷰클래스를이용
2. 레이아웃XML로화면구성하기

- 각각의 속성들로 구분한다.
- 버튼에 대한 element를 만들고 기능은 속성(attribute)가 만든다.
- View 를 LinearLayout으로 바꿈

2. 뷰 클래스
1. 뷰클래스의 기본구조
- 뷰 객체의 계층 구조
- View: 뷰 클래스의 최상위 클래스 ( 액티비티는 View의 서브 클래스만 화면에 출력 )
- ViewGroup: 다른 뷰 여러 개를 묶어서 제어할 목적으로 사용
- TextView: UI 출력 목적

- ViewGroup클래스의하위인레이아웃클래스는 다른뷰(TextView,ImageView등)객체여러개를담아서한꺼번에제어할목적으로사용


- 뷰의표시여부설정

2. 레이아웃중첩
- 뷰의 계층 구조는 레이아웃 객체를 중첩해서 복잡하게 구성 가능
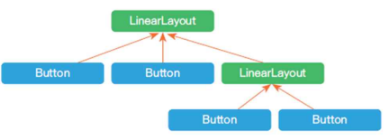
- 버튼3는 Linear를 따르고 예는 main을 따르닌까 화면에 꽉참
- main 속성이 화멱 꽉차게 되어 있음
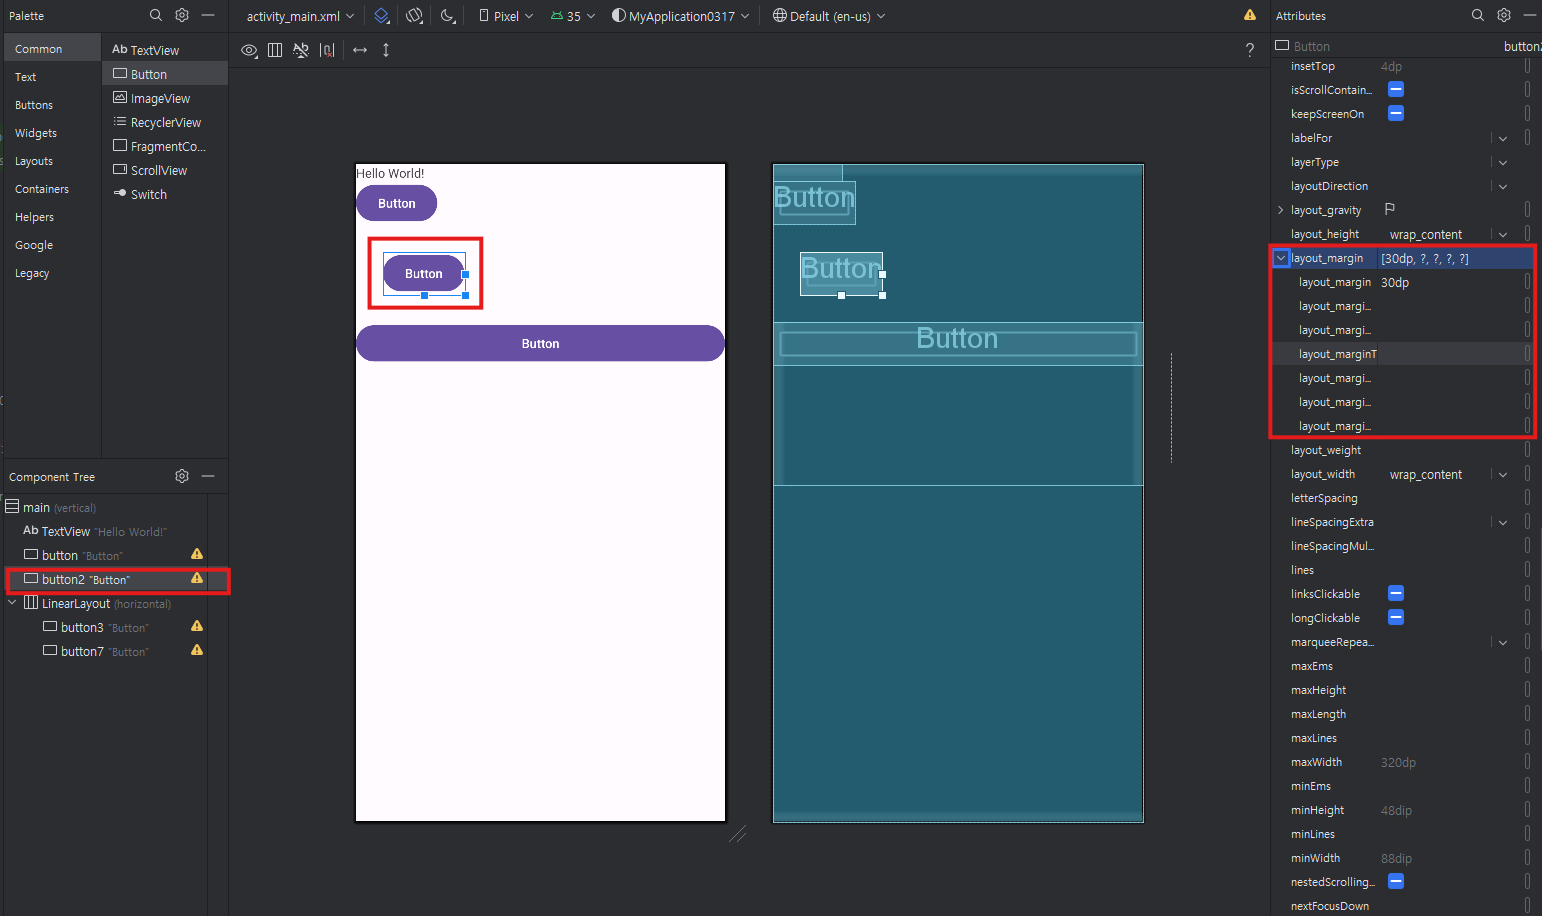
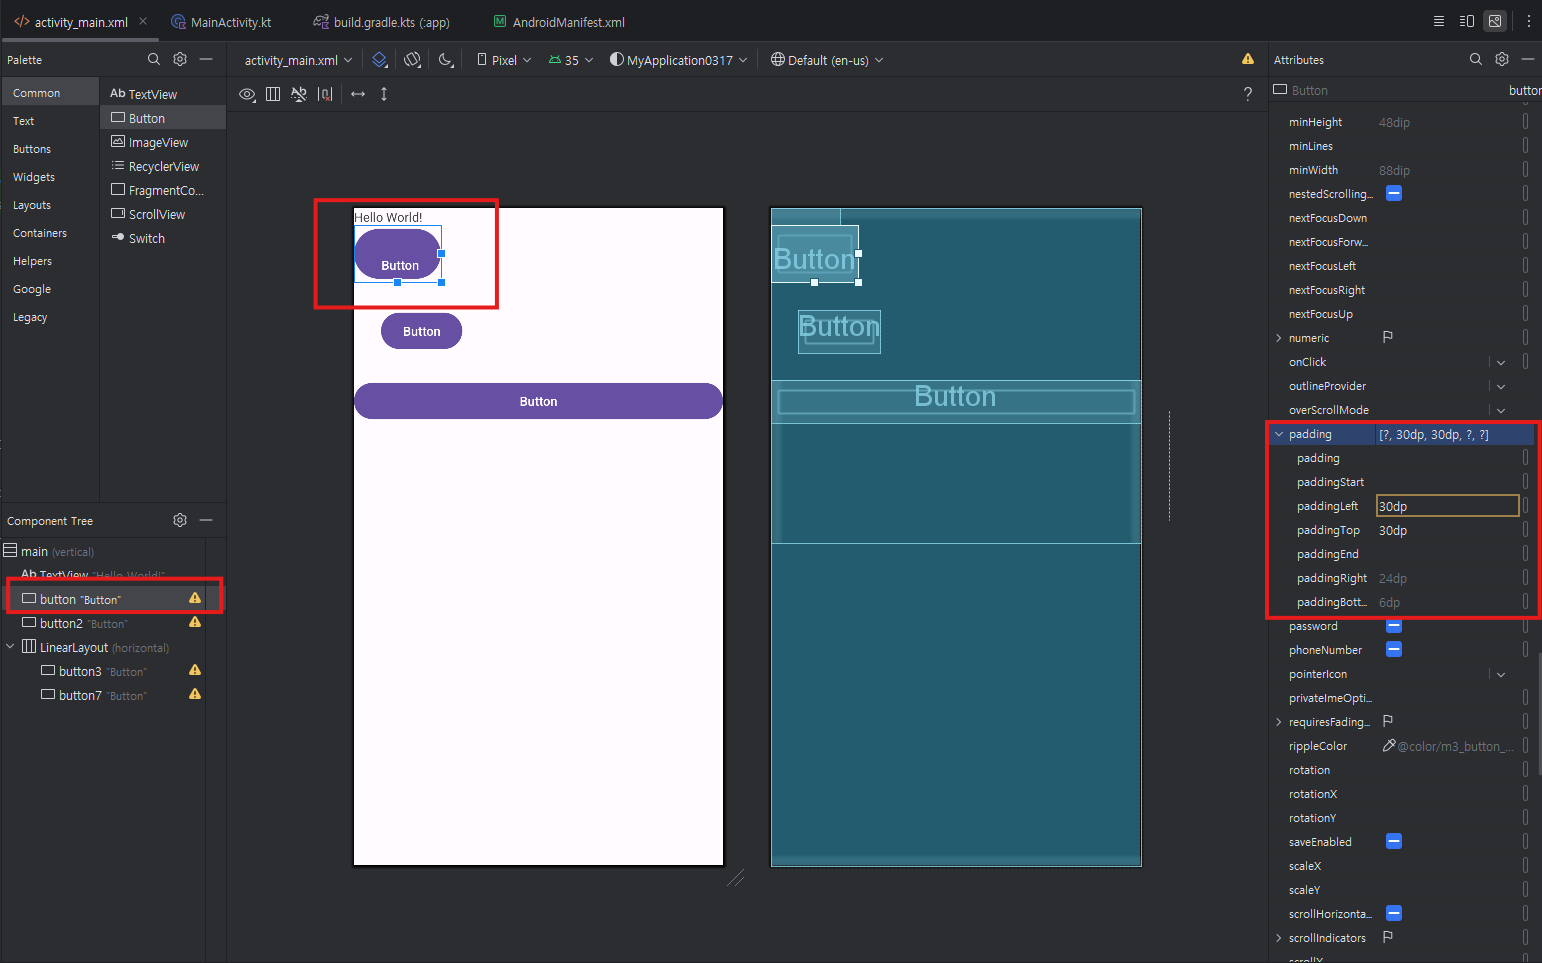
- margin, padding: 적당한 여백
- margin: 내 밖에 있는 요소와 간격을 두겠다
- padding: 내 안에 있는 요소와 간격을 두겠다.

3. 버튼 속성 편집하기
4. 레이아웃XML의뷰를코드에서사용하기
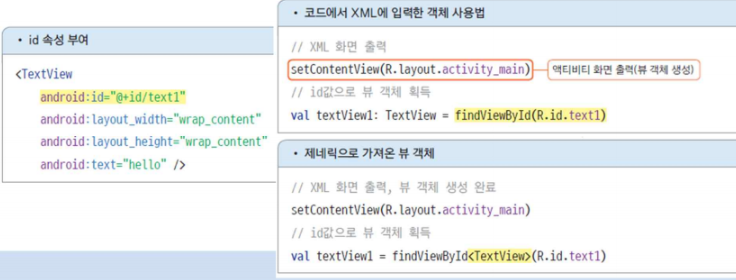
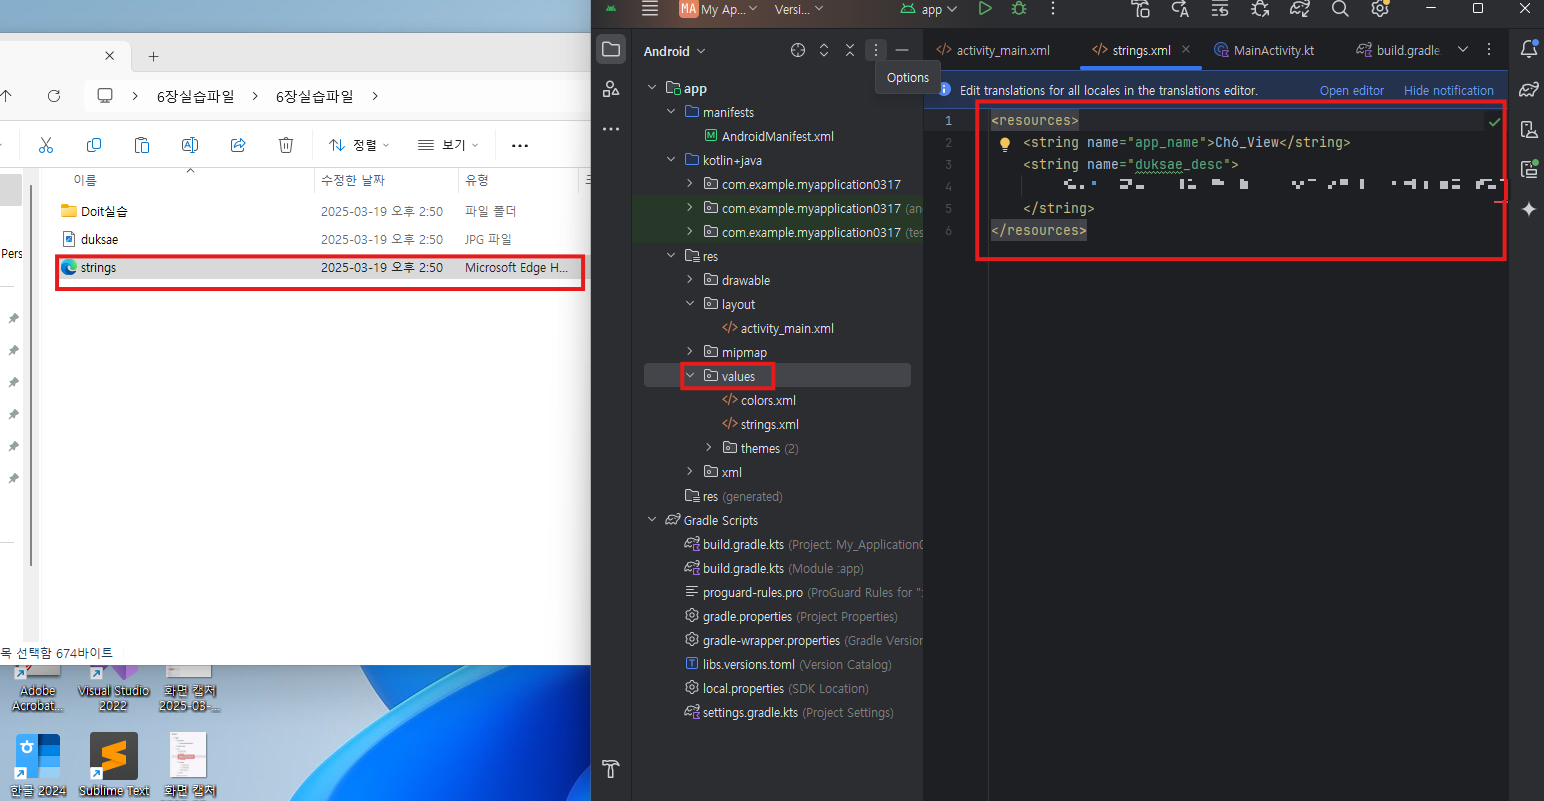
- 객체를식별하기위한식별자값을지정하기위한속성이id
- XML에id속성을추가하면자동으로R.java파일에상수변수로추가
- 코드에서findViewById()함수를이용해객체획득
- activity_main.xml을 화면으로 쓰겠다
- 각각의 요소들은 속성을 갖고, 속성들로 디자인을 할 수 있다.
- 직관적인 디자인을 할 수도 있고, xml로 편집할 수도 있다.

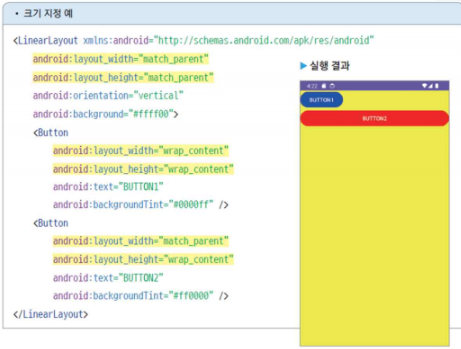
5. 뷰의 크기를 지정하는 방법
- layout_width, layout_height
- 수치, match_parent, wrap_content
- 뷰의 간격 설정: margin, padding
- margin, padding 속성을 이용하면 간격이 네방향 모두 같은 크기로 설정
- paddingLeft, paddingRight, paddingTop, paddingBotom와 layout_marginLeft, layout_marginRight, layout_marginTop, layout_marginBotom 속성을 이용가능
6. 뷰의 표시 여부
- visible, invisible, gone 으로 설정
- invisible은 뷰가 화면에 보이지 않지만 자리는 차지
- gone으로 설정하면 자리 조차 차지 하지 않음
3. 기본적인 뷰 살표보기
1. 텍스트 뷰 : TextView
- 기본적으로 제공되는 뷰, 사용자가 수정할 수 없는 글자, 개발자가 표현하고 싶은 글자
- 화면에 글자를 표현
- layout_width, layout_hieght 는 만드시 써야 하는 속성이다. (없으면 실행 오류)
- 직접적인 숫자
- wrqp_content: 내가 담고 있는
- match_parent: 부모가 포함하고 있는 크기
- android : text 속성 : TextView에 출력 할 문자열을 지정 (android:text="heloworld", android:text="@string/helo")
- android : textColor 속성 : 문자열의색상을지정 (android:textColor="#FF0000")

- android : textSize 속성 : 문자열의크기를지정 (android:textSize="20sp")
- android : textStyle 속성 : 문자열의스타일을지정 (android:textStyle="bold" bold,italic,normal중에서선택)

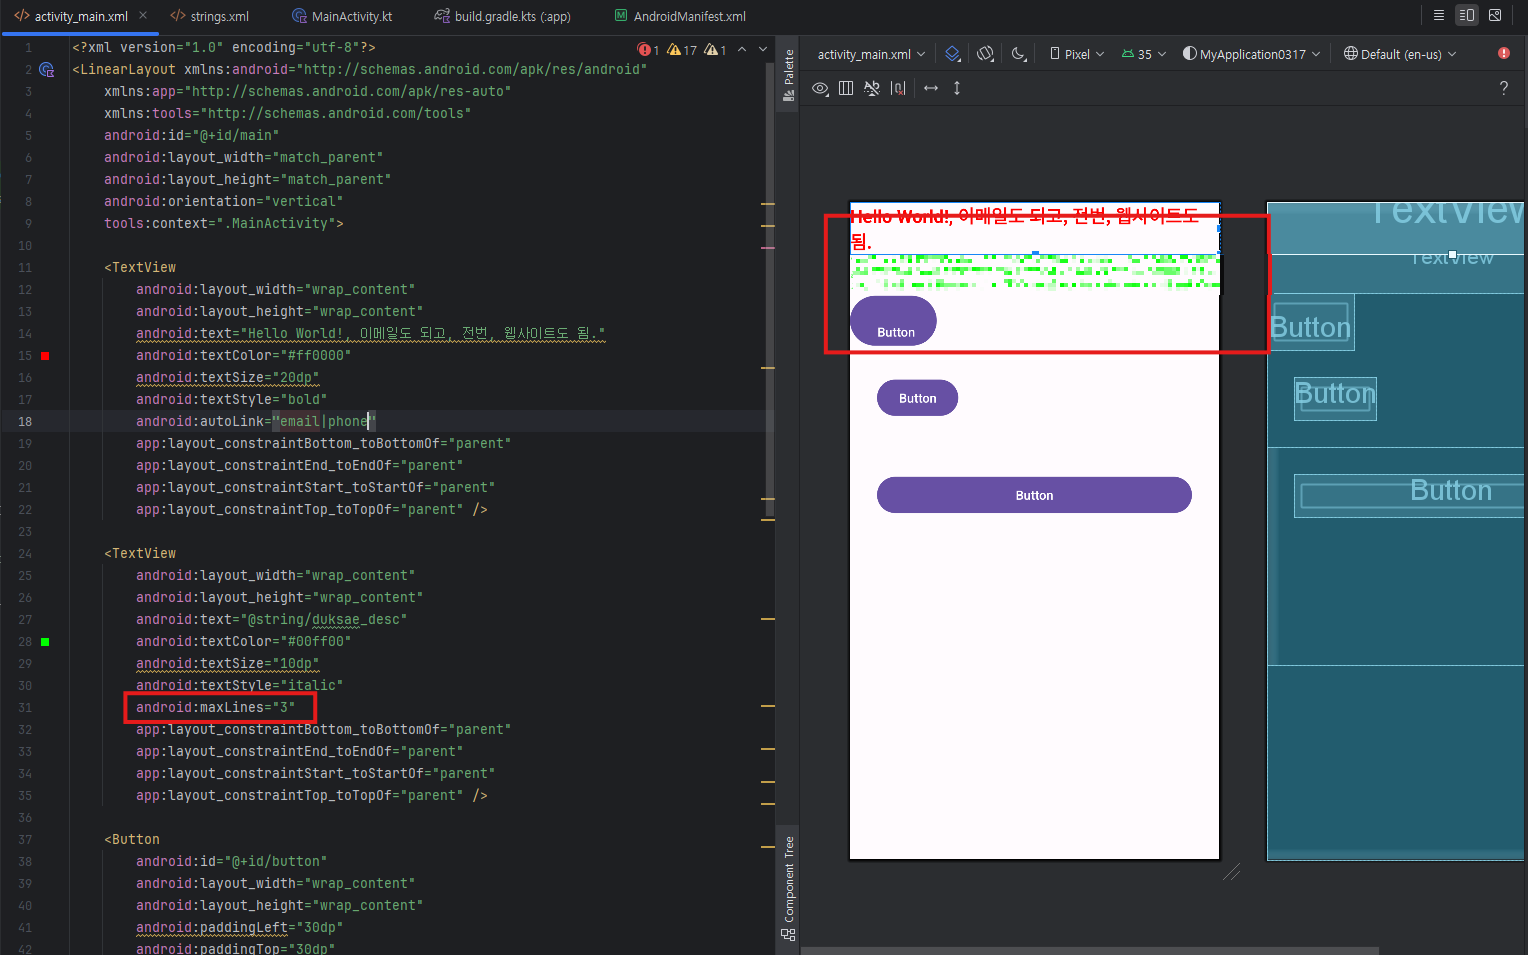
- android : autoLink 속성 : 출력 할 문자열을 분석해 특정형태의 문자열에 자동 링크를 추가 (android:autoLink=”web” ▪web,phone,email등을사용)
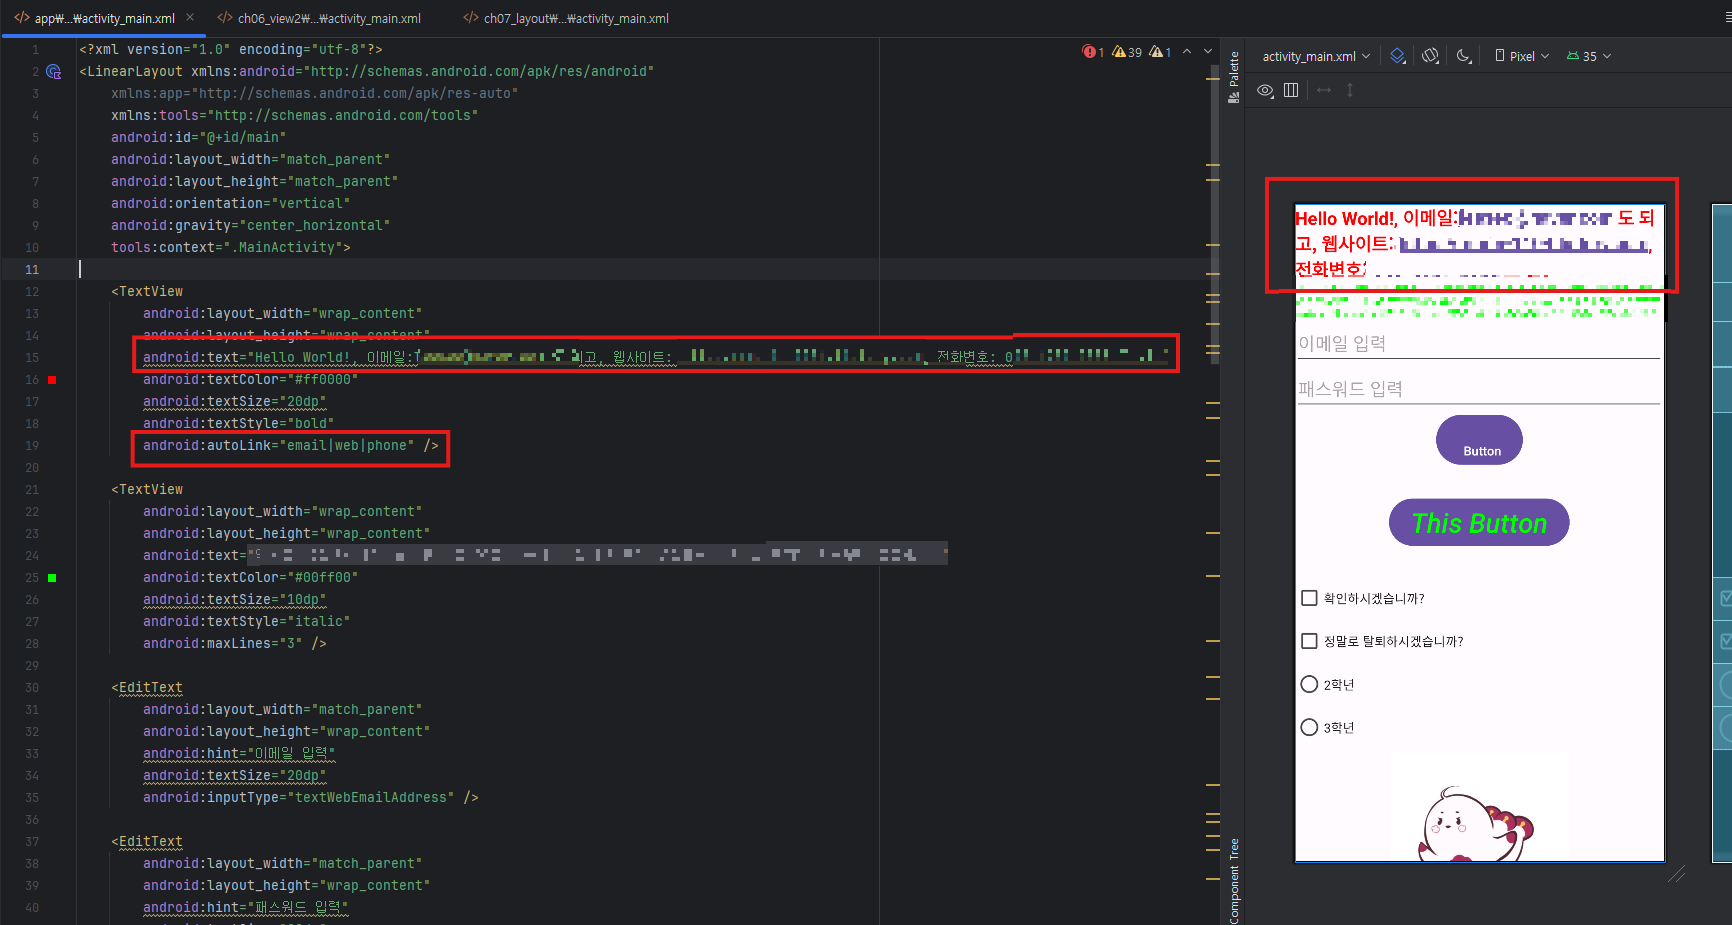
- android : maxLines 속성 : 문자열이 특정줄까지만 나오도록 하는 속성 (android:maxLines="3")
- android : elipsize 속성 : 문자열이 더있다는 것을 표시하기 위한 줄임표(.)를 추가 (end,middle,start값지정)
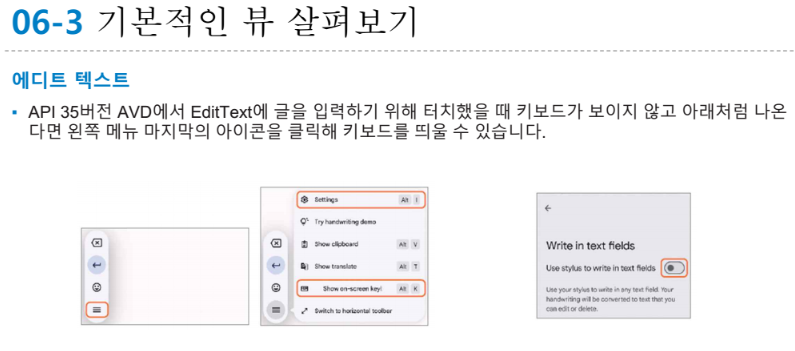
2. 에디트 텍스트 : 사용자 텍스트 입력
- 글을 입력할 수 있는 뷰

- android : lines, android : maxLines 속성
- 처음부터 여러 줄 입력크기로 나오게 하는 속성이 android:lines
- maxLines은 처음에는 한 줄 입력크기로 출력되다 지정한 크기까지 늘어남
- android : inputType 속성
- 글을 입력할 때 올라오는 키보드를 지정하는 속성
- android : inputType = "phone"

3. 외부 글 가져오기
4. 버튼
- 사용자 이벤트를 처리함.

(안드로이드 단위: dp, sp)
- 디바이스 단위로, 상대적인 크기 설정이 가능
- 남은 공간을 적절히 잘 나눠쓰겠다.
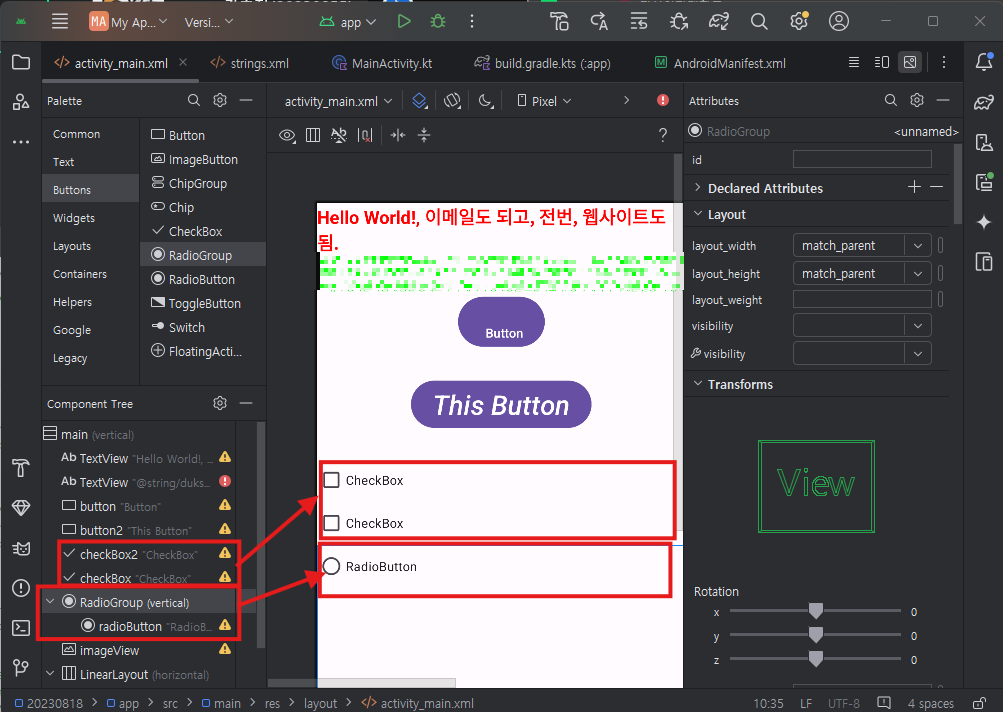
체크 박스
- 다중 선택
- 혼자 사용가능
레디오버튼
- 단일 선
- 혼자 사용 안됨.
- 선택이 되는 순간 다른 선택은 off
- 그룹을 만들어야 한다.
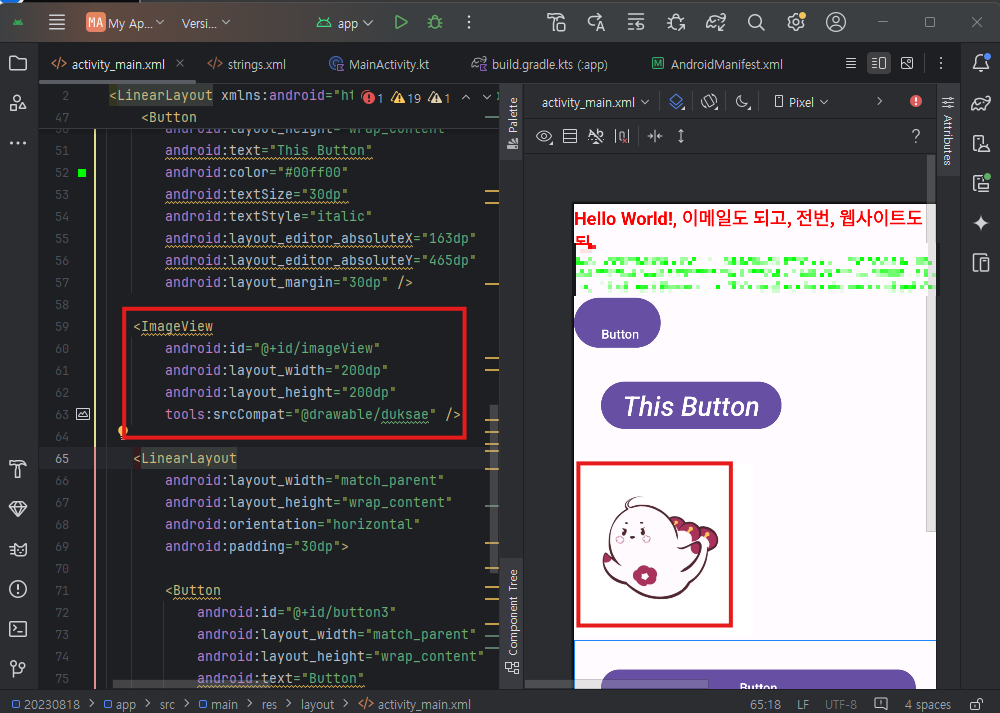
5. 이미지
- 이미지를 화면에 출력하는 뷰


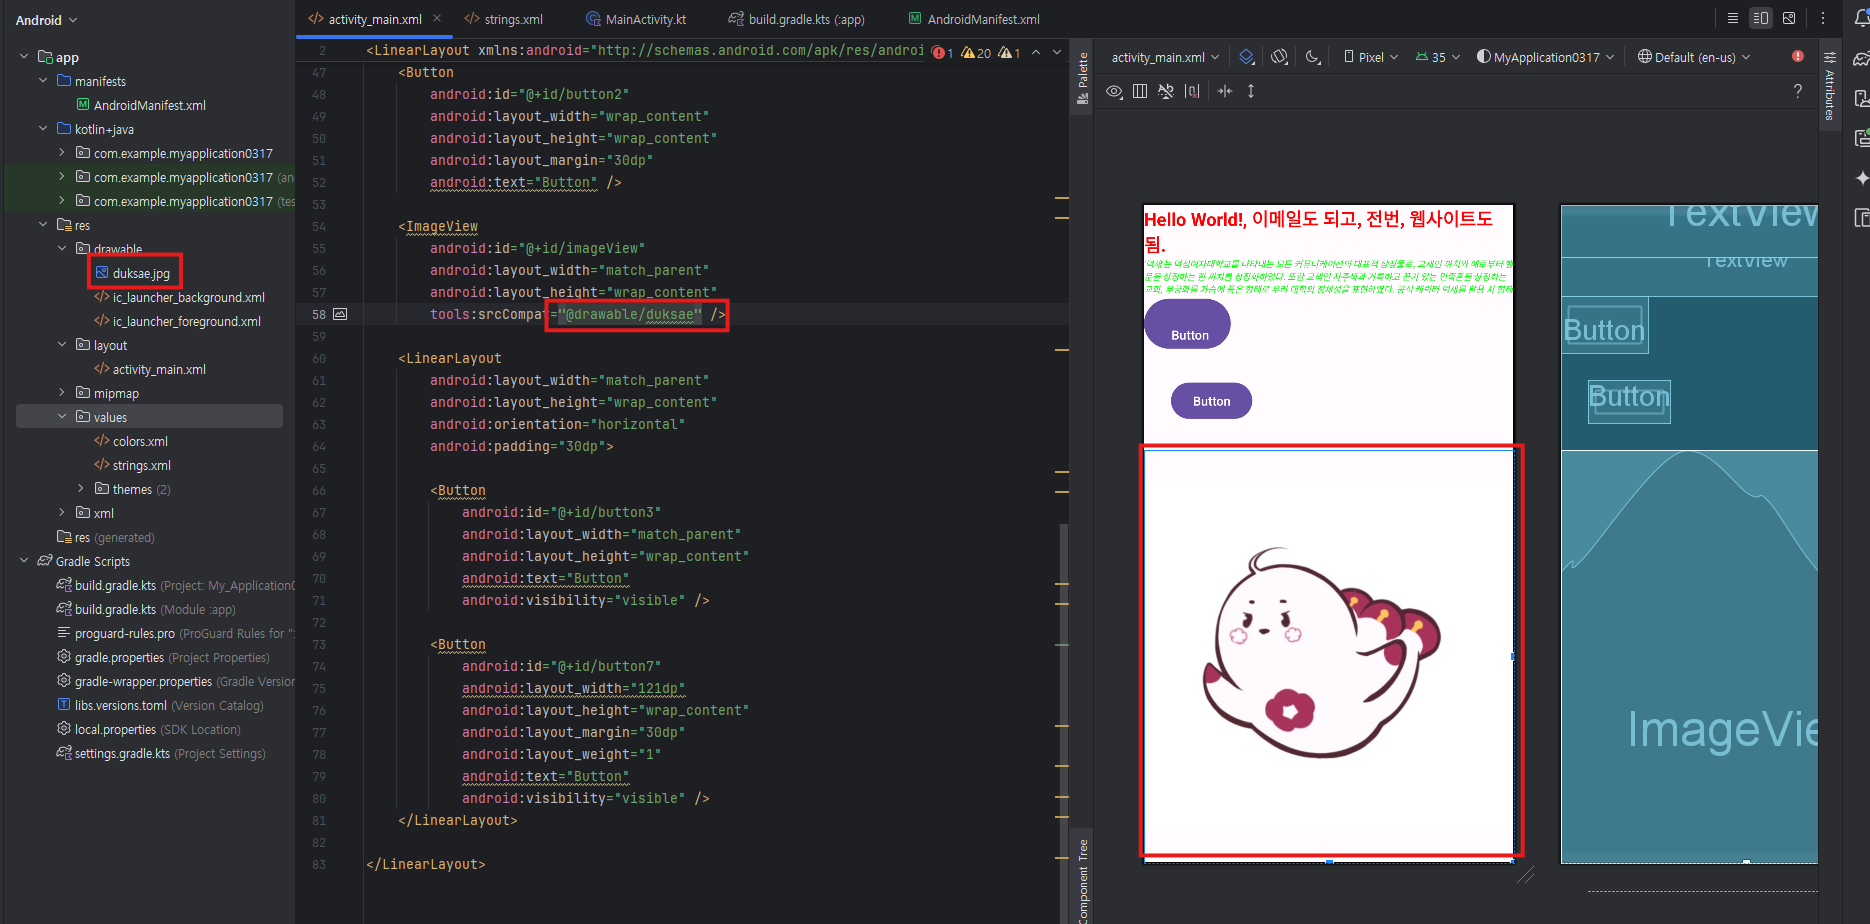
- android:src속성:출력할이미지를설정 (android:src="@drawable/image3")
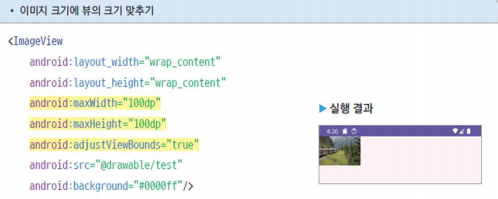
이미지 크기 줄이기
- android : maxWidth / maxHeight / adjustViewBounds 속성 : 이미지의 최대크기를 지정
- maxWidth, maxHeight
- android : adjustViewBounds : true로 설정하면 이미지의 가로세로 길이와 비례해 뷰의 크기를 맞춤
6. 기본적인 뷰 모아보기

4. 뷰 바인딩
- 레이아웃 xml파일에 선언한 뷰 객체를 코드에서 쉽게 이용하는 방법
- 레이아웃 XML 파일에 등록된 뷰 객체를 쉽게 사용할 수 있는 방법 제공

5. 카카오톡 비밀번호 확인 화면 만들기
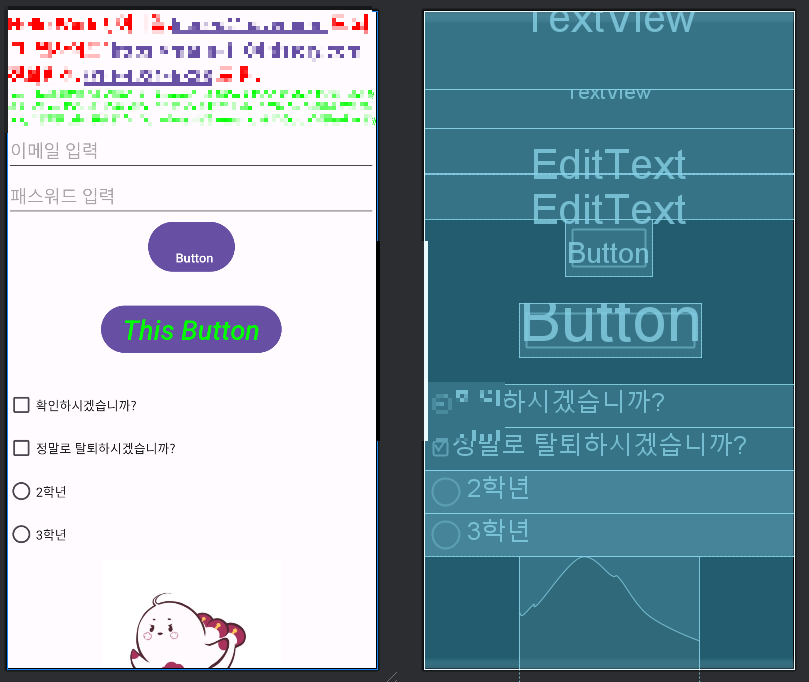
<?xml version="1.0" encoding="utf-8"?>
<LinearLayout xmlns:android="http://schemas.android.com/apk/res/android"
xmlns:app="http://schemas.android.com/apk/res-auto"
xmlns:tools="http://schemas.android.com/tools"
android:id="@+id/main"
android:layout_width="match_parent"
android:layout_height="match_parent"
android:orientation="vertical"
android:gravity="center_horizontal"
tools:context=".MainActivity">
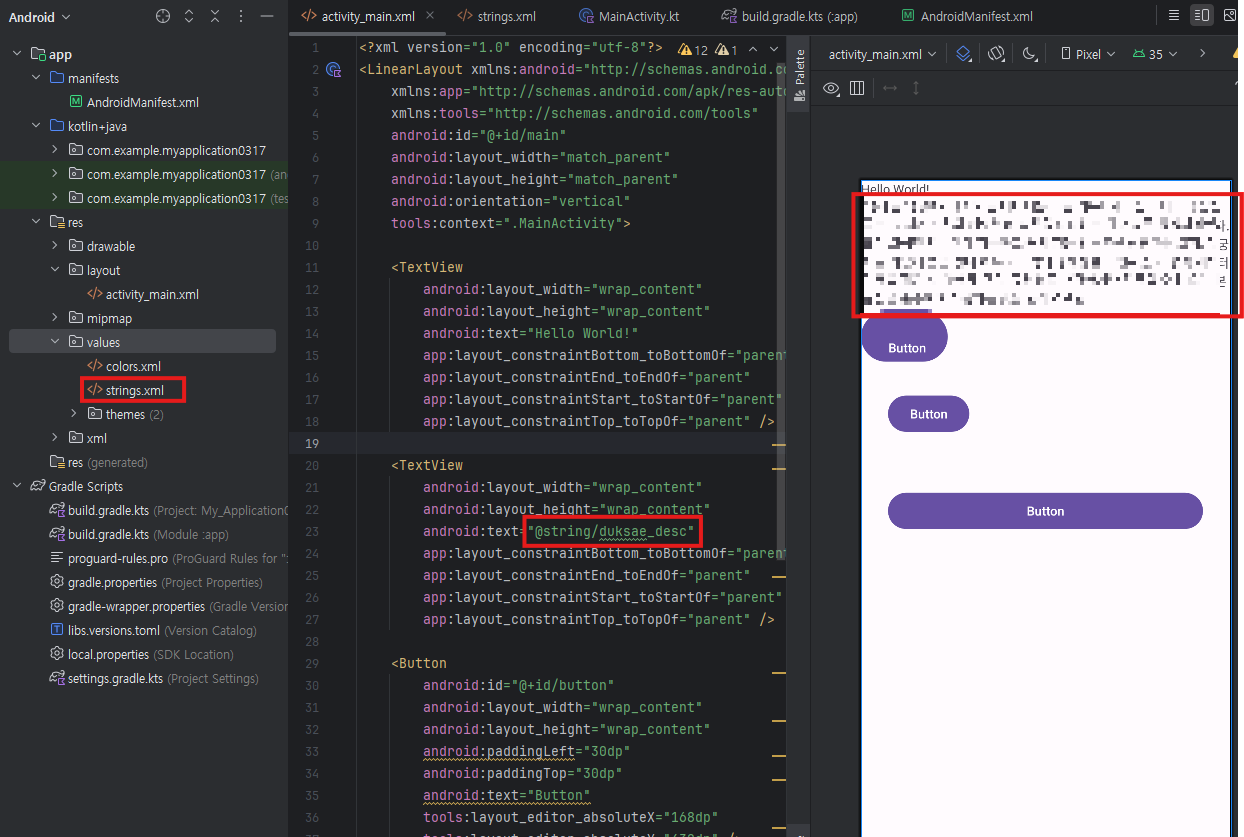
<TextView
android:layout_width="wrap_content"
android:layout_height="wrap_content"
android:text="Hello World!, 이메일:leeseo@naver.com 도 되고, 웹사이트: https://marin-1104.tistory.com, 전화변호: 010-4931-5338 도 됨."
android:textColor="#ff0000"
android:textSize="20dp"
android:textStyle="bold"
android:autoLink="email|web|phone" />
<TextView
android:layout_width="wrap_content"
android:layout_height="wrap_content"
android:text="@string/duksae_desc"
android:textColor="#00ff00"
android:textSize="10dp"
android:textStyle="italic"
android:maxLines="3" />
<EditText
android:layout_width="match_parent"
android:layout_height="wrap_content"
android:hint="이메일 입력"
android:textSize="20dp"
android:inputType="textWebEmailAddress" />
<EditText
android:layout_width="match_parent"
android:layout_height="wrap_content"
android:hint="패스워드 입력"
android:textSize="20dp"
android:inputType="textPassword" />
<Button
android:id="@+id/button"
android:layout_width="wrap_content"
android:layout_height="wrap_content"
android:paddingStart="30dp"
android:paddingTop="30dp"
android:text="Button" />
<Button
android:id="@+id/button2"
android:layout_width="wrap_content"
android:layout_height="wrap_content"
android:text="This Button"
android:textColor="#00ff00"
android:textSize="30dp"
android:textStyle="italic"
android:layout_margin="30dp" />
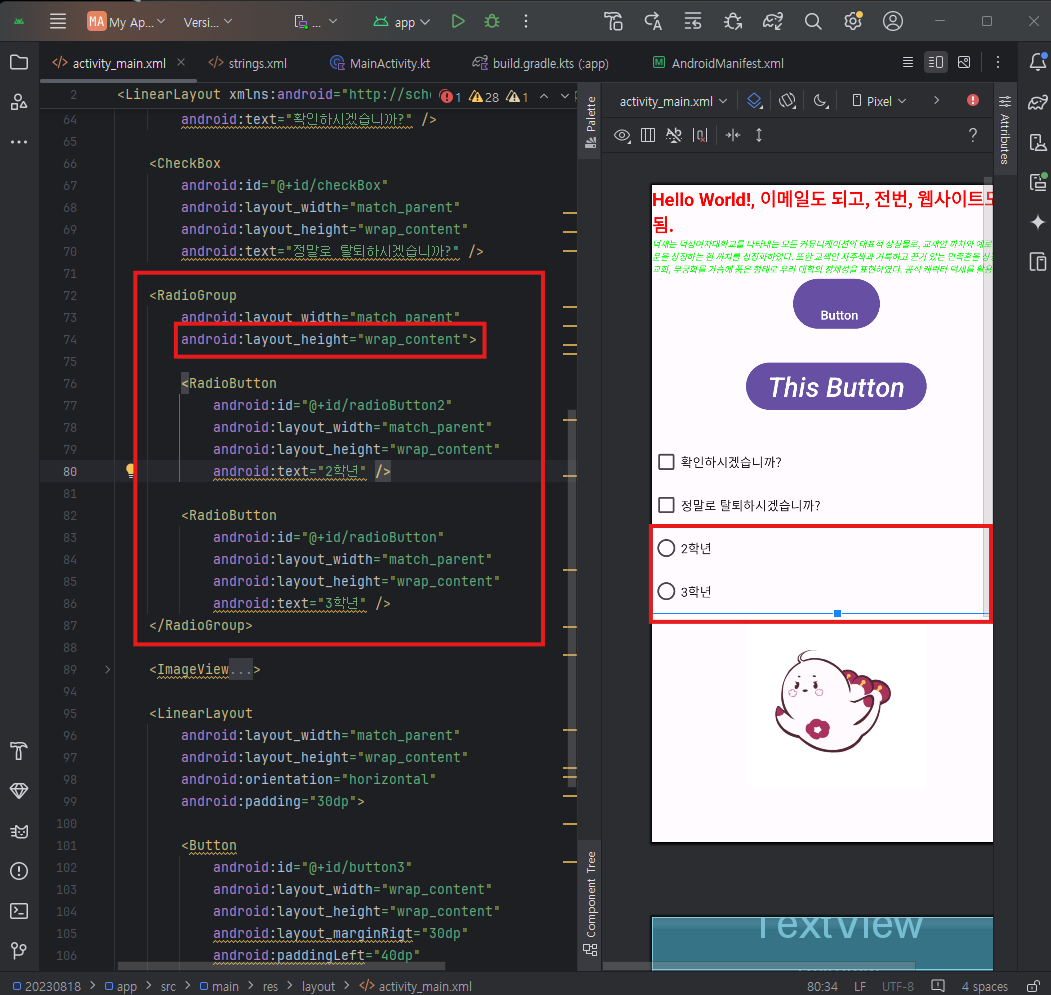
<CheckBox
android:id="@+id/checkBox2"
android:layout_width="match_parent"
android:layout_height="wrap_content"
android:text="확인하시겠습니까?" />
<CheckBox
android:id="@+id/checkBox"
android:layout_width="match_parent"
android:layout_height="wrap_content"
android:text="정말로 탈퇴하시겠습니까?" />
<RadioGroup
android:layout_width="match_parent"
android:layout_height="wrap_content">
<RadioButton
android:id="@+id/radioButton2"
android:layout_width="match_parent"
android:layout_height="wrap_content"
android:text="2학년" />
<RadioButton
android:id="@+id/radioButton"
android:layout_width="match_parent"
android:layout_height="wrap_content"
android:text="3학년" />
</RadioGroup>
<ImageView
android:id="@+id/imageView"
android:layout_width="200dp"
android:layout_height="200dp"
tools:srcCompat="@drawable/duksae" />
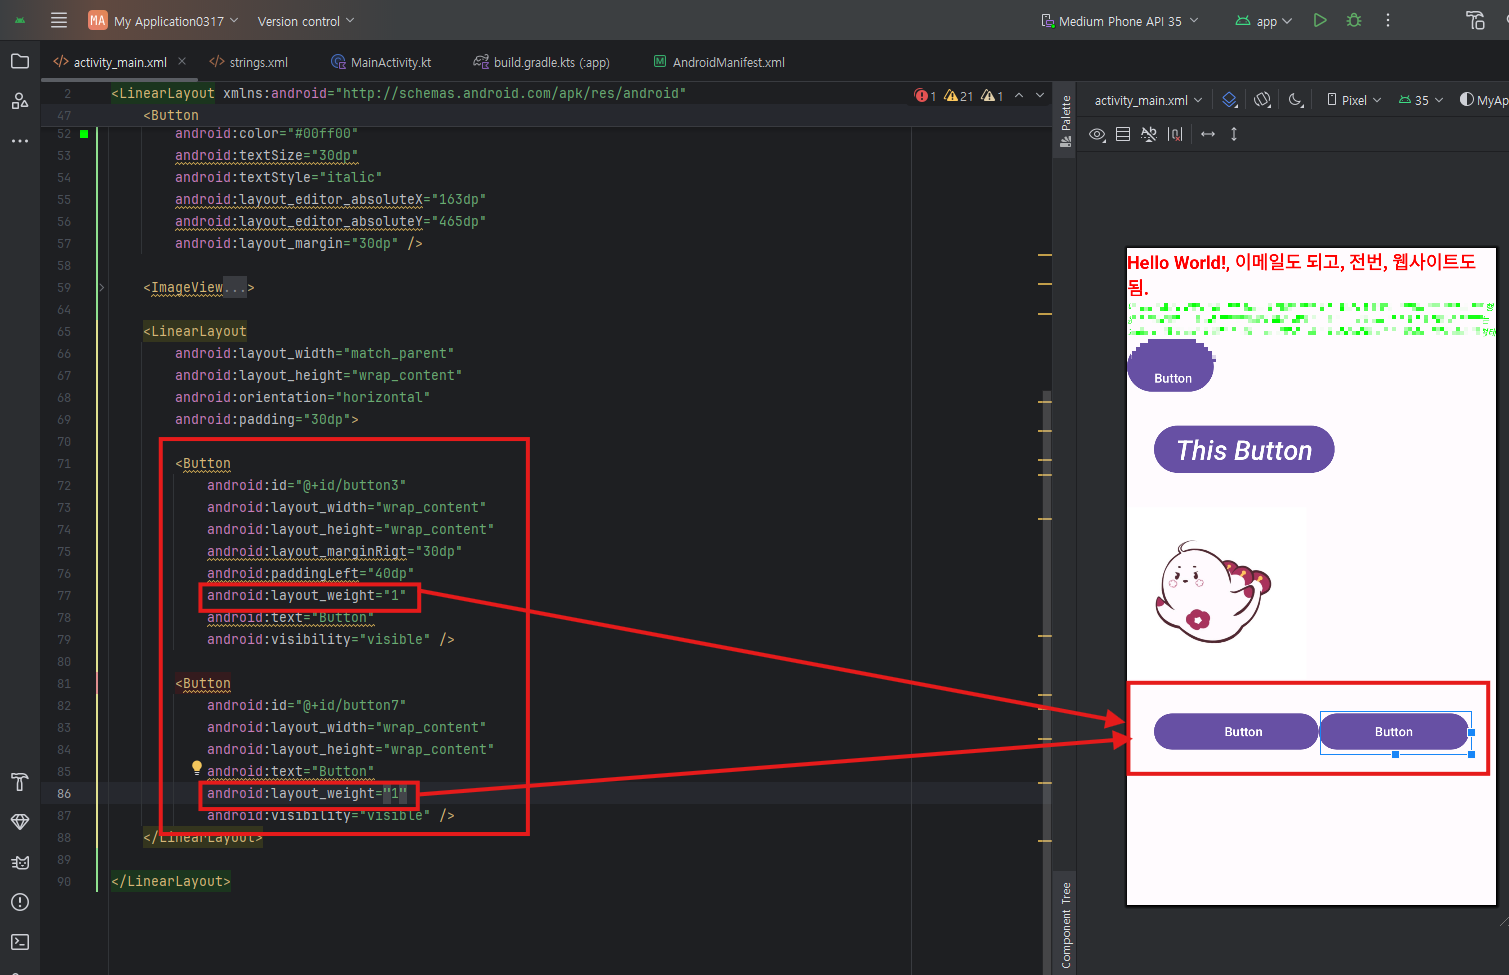
<LinearLayout
android:layout_width="match_parent"
android:layout_height="wrap_content"
android:orientation="horizontal"
android:padding="30dp">
<Button
android:id="@+id/button3"
android:layout_width="wrap_content"
android:layout_height="wrap_content"
android:layout_marginRight="30dp"
android:paddingStart="40dp"
android:layout_weight="1"
android:text="Button" />
<Button
android:id="@+id/button7"
android:layout_width="wrap_content"
android:layout_height="wrap_content"
android:text="Button"
android:layout_weight="1" />
</LinearLayout>
</LinearLayout>

<?xml version="1.0" encoding="utf-8"?>
<LinearLayout xmlns:android="http://schemas.android.com/apk/res/android"
    xmlns:app="http://schemas.android.com/apk/res-auto"
    xmlns:tools="http://schemas.android.com/tools"
    android:id="@+id/main"
    android:layout_width="match_parent"
    android:layout_height="match_parent"
    android:orientation="vertical"
    android:gravity="center_horizontal"
    tools:context=".MainActivity">

    <TextView
        android:layout_width="match_parent"
        android:layout_height="wrap_content"
        android:text="@string/main_desc"
        app:layout_constraintBottom_toBottomOf="parent"
        app:layout_constraintEnd_toEndOf="parent"
        app:layout_constraintStart_toStartOf="parent"
        app:layout_constraintTop_toTopOf="parent" />


    <EditText
        android:layout_width="match_parent"
        android:layout_height="wrap_content"
        android:hint="abc@duksung.ac.kr"
        android:inputType="textEmailAddress" />

    <EditText
        android:layout_width="match_parent"
        android:layout_height="wrap_content"
        android:hint="비밀번호"
        android:inputType="textPassword" />

    <TextView
        android:layout_width="match_parent"
        android:layout_height="wrap_content"
        android:text="@string/password_txt" />

    <Button
        android:layout_width="match_parent"
        android:layout_height="wrap_content"
        android:text="확인" />

    <ImageView
        android:layout_width="200dp"
        android:layout_height="200dp"
        android:src="@drawable/duksae" />

</LinearLayout>
6. 한번해보기

<?xml version="1.0" encoding="utf-8"?>
<LinearLayout xmlns:android="http://schemas.android.com/apk/res/android"
    xmlns:app="http://schemas.android.com/apk/res-auto"
    xmlns:tools="http://schemas.android.com/tools"
    android:id="@+id/main"
    android:layout_width="match_parent"
    android:layout_height="match_parent"
    android:orientation="vertical"
    android:gravity="center_horizontal"
    tools:context=".MainActivity">

    <TextView
        android:layout_width="match_parent"
        android:layout_height="wrap_content"
        android:text="@string/main_desc"
        android:textSize="16sp"
        android:textColor="#D81B60"
        android:padding="10dp"
        app:layout_constraintBottom_toBottomOf="parent"
        app:layout_constraintEnd_toEndOf="parent"
        app:layout_constraintStart_toStartOf="parent"
        app:layout_constraintTop_toTopOf="parent" />


    <EditText
        android:layout_width="match_parent"
        android:layout_height="wrap_content"
        android:hint="kkang104@gmail.com"
        android:textSize="14sp"
        android:padding="10dp"
        android:textColor="#42A5F5"
        android:inputType="textEmailAddress" />

    <EditText
        android:layout_width="match_parent"
        android:layout_height="wrap_content"
        android:hint="비밀번호"
        android:inputType="textPassword"
        android:textSize="14sp"
        android:padding="10dp"
        android:textColor="#000000"/>

    <TextView
        android:layout_width="match_parent"
        android:layout_height="wrap_content"
        android:text="@string/password_txt"
        android:textSize="14sp"
        android:textColor="#000000"
        android:padding="10dp"/>

    <Button
        android:layout_width="match_parent"
        android:layout_height="wrap_content"
        android:text="확인"
        android:textSize="16sp"
        android:textColor="#FFFFFF"
        android:layout_marginTop="5dp"
        android:layout_margin="10dp" />

    <ImageView
        android:layout_marginTop="75dp"
        android:layout_width="250dp"
        android:layout_height="250dp"
        android:src="@drawable/image" />

</LinearLayout>
'SPECIALIZED > Android' 카테고리의 다른 글
| 7. 리소스 활용하기 (0) | 2025.04.03 |
|---|---|
| 6. 뷰를 배치하는 레이아웃 (0) | 2025.03.27 |
| 4. XML소개 (0) | 2025.03.24 |
| 3. 안드로이드 프로그래밍 - 안드로이드앱의 기본구조 및 세팅 (0) | 2025.03.19 |
| 2. 안드로이드 프로그래밍 - 코틀린 시작하기 (코틀린 문법) (0) | 2025.03.17 |